I have used CIM or WMI class in my PowerShell scripts many times and I always needed a select statement with properties that function will return as a resultset.
It is easy to use select * to get all properties but when you finalize the decision which properties are needed it is prone to typing errors to write them on your own while writing the code plus having its own function to do work for us make us more efficient.
Let me quickly demonstrate the function with one simple example. We run the following code in the new Script Pane of PowerShell ISE environment in order to get the result in that same Script pane.
Select-CIMClassAllProperties -classname "CIM_Processor"As a result, we get the call to the class using Get-CimInstance CmdLet and result pipelined to a select statement with all properties that belong to this class.
Get-CimInstance -Class CIM_Processor | Select-Object AddressWidth, Availability, Caption, ConfigManagerErrorCode, ConfigManagerUserConfig, CreationClassName, CurrentClockSpeed, DataWidth, Description, DeviceID, ErrorCleared, ErrorDescription, Family, InstallDate, LastErrorCode, LoadPercentage, MaxClockSpeed, Name, OtherFamilyDescription, PNPDeviceID, PowerManagementCapabilities, PowerManagementSupported, Role, Status, StatusInfo, Stepping, SystemCreationClassName, SystemName, UniqueId, UpgradeMethod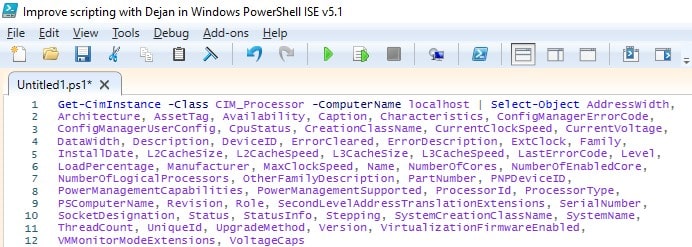
If we run the generated code we will get the result with the CPU properties for the local machine. So now, for example, we can decide which properties we want to use in the function that we will create as a wrapper of this CIM class.

INFO: If you want to list all the properties and data types of class please read this article where I have written a function for that. How To List CIM Or WMI Class All Properties And Their Datatypes With PowerShell.
Table of Contents
Select-CIMClassAllProperties CmdLet – Explained
This CmdLet covers not just CIM classes but rather WMI classes as well.
Select-CIMClassAllProperties CmdLet – Input Parameters
As input parameters we have:
- classname – Name of the CIM or WMI class that can be passed directly calling the function.
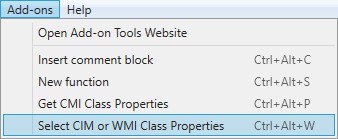
- SelectedText – Value of the selected text in the PowerShell ISE Script Pane. Write the class name and select it in PowerShell ISE Script Pane and click on menu item Add-ons -> “Get CMI Class Properties” to call the same function.
- InstallMenu – a parameter used to add function as a menu item in Add-ons menu of PowerShell ISE if set to true.
- ComputerName – Name of a computer with a default value of the local machine.
Function Select-CIMClassAllProperties {
[CmdletBinding()]
param (
    [Parameter(HelpMessage="CIM or WMI class name.")]
    [string]$classname,
    $SelectedText = $psISE.CurrentFile.Editor.SelectedText,
    $InstallMenu,
    $ComputerName = 'localhost'
)
}INFO: To know more about PowerShell Parameters and Parameter Sets with some awesome examples please read the following articles How To Create Parameters In PowerShell and How To Use Parameter Sets In PowerShell Functions.
BEGIN Block
In the BEGIN block we:
- If parameter $InstallMenu set to true we add the function as a menu item to Add-ons menu of PowerShell ISE environment.
BEGIN {
        if ($InstallMenu)
        {
            Write-Verbose "Try to install the menu item, and error out if there's an issue."
            try
            {
                $psISE.CurrentPowerShellTab.AddOnsMenu.SubMenus.Add("Select CIM or WMI Class Properties",{Select-CIMClassAllProperties},"Ctrl+Alt+W") | Out-Null
            }
            catch
            {
                Return $Error[0].Exception
            }
        }
}
PROCESS Block
In the PROCESS block we:
- We run this piece of code only if the function has been added as a menu item (!$InstallMenu)
- Error Handling using try-catch blocks and writing errors in an external text file using Write-ErrorLog CmdLet.
- Prepare class name depending on which input parameter was provided.
- We get properties using the Get-CimInstance CmdLet.
- We prepare the result looping all the class properties. (ForEach-Object)
- Return the result in the PowerShell ISE Script pane.
PROCESS {

        if (!$InstallMenu)
        {
            Write-Verbose "Don't run a function if we're installing the menu"
            try
            {
                Write-Verbose "Write Select statment for all the properties of CIM or WMI Class."

                if ($SelectedText )
                {
                    $class = "$SelectedText"
                } else {
                    $class = "$classname"
                }

                $CmiClass = Get-CimInstance -Class $class -ComputerName $ComputerName | Get-Member -MemberType Property | Select-Object Name

                $FirstItem = $true
                $CmiClass |

                ForEach-Object {
                    $propertyname = $_.Name
                    if ($FirstItem -eq $true) {
                        $properties = $propertyname
                        $FirstItem = $false
                    } else {
                        $properties = "$properties, $propertyname"
                    }
                }

                $l = $psise.CurrentFile.Editor.CaretLine
                $c = $psise.CurrentFile.Editor.CaretColumn
                $x = ''

                if ($c -ne 0)
                {
                    $x = ' ' * ($c - 1)
                }

                $psise.CurrentFile.Editor.InsertText("Get-CimInstance -Class $class -ComputerName $ComputerName | Select-Object $properties")
                $psise.CurrentFile.Editor.SetCaretPosition($l, $c + 3)

            }
            catch
            {
                Return $Error[0].Exception
            }
        }
}INFO: To learn about PowerShell Error Handling and code debugging please read the following articles: How To Log PowerShell Errors And Much More and How To Debug PowerShell Scripts.
END Block
END block is empty.
INFO: To understand BEGIN, PROCESS and END blocks in PowerShell please read PowerShell Function Begin Process End Blocks Explained With Examples.
Comment-Based Help Section
For every one of my own CmdLets, I write Comment-Based help as well.
INFO: If you want to learn how to write comment-based Help for your own PowerShell Functions and Scripts please read these articles How To Write PowerShell Help (Step by Step). In this article How To Write PowerShell Function’s Or CmdLet’s Help (Fast), I explain the PowerShell Add-on that help us be fast with writing help content.
Execution Examples Region
In order to make this function PowerShell ISE Add-on we need to call the function for the first time with parameter InstallMenu set to true.
In the next section, I explain how to set up function, module file, module manifest file and profile file in PowerShell to achieve that function becomes part of the PowerShell ISE environment.
#region Execution examples

    Select-CIMClassAllProperties -InstallMenu $true
    #Select-CIMClassAllProperties -classname "CIM_Processor"

#endregion
How To Add Select-CIMClassAllProperties CmdLet As Add-On Into PowerShell ISE
Here are the steps that we have followed in order to have that Add-on in PowerShell ISE environment: ( You have all this already done if you have downloaded the zip file with the source code.)
- have created 09addons folder where my Modules are and for me, that was this location C:\Users\$env:USERNAME\[My] Documents\WindowsPowerShell\Modules
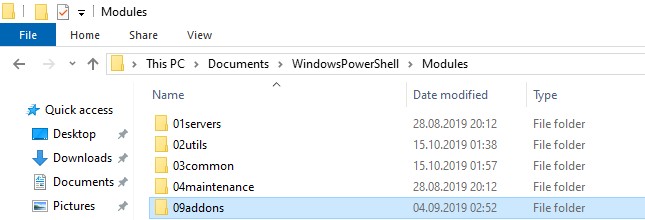
- have saved Select-CIMClassAllProperties as PowerShell script (.ps1 file) in 09addons folder.
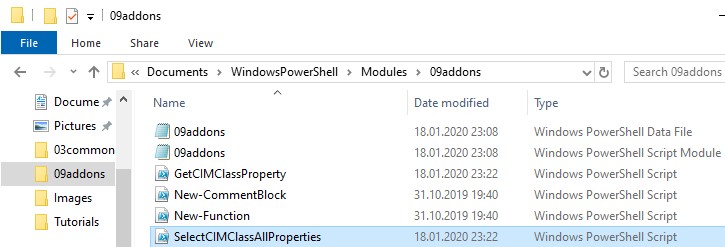
- have customized 09addons.psm1 module file with this line of code in order to load Select-CIMClassAllProperties CmdLet into 09addons module.
. $psScriptRoot\SelectCIMClassAllProperties.ps1
- have customized Manifest file 09addons.psd1 to export the newly created function Select-CIMClassAllProperties.

- have customized Profile file ( Microsoft.PowerShellISE_profile.ps1) location for me: (C:\Users\$env:USERNAME\[My] Documents\WindowsPowerShell) with this line of code in order to Import 09addons Module.
Import-Module 09addons
INFO: If you want to learn more about PowerShell Profiles and Modules please read the following articles. How To Create A Powershell Module (Different Approach) and How To Create PowerShell Profile Step by Step with Examples.
INFO: Interested in PowerShell Module Manifest please read How To Create A PowerShell Module Manifest section.
What Happens When You Start PowerShell ISE?
If you wonder why we have done all the steps in the previous section here is an explanation of PowerShell Workflow when every session starts
When you open Windows PowerShell ISE here are things that happen in the background even before we see the ISE window:
- New PowerShell session starts for the current user
- PowerShell profile files have been loaded into the session (one of them is Microsoft.PowerShellISE_profile.ps1 that we have just customized)
- The profile file will import modules. In our example, it will load the 09addons module among the others
- When the modules are imported the code inside the Script module file (.psm1) is executed. In our example, SelectCIMClassAllProperties.ps1 script file will be executed
- When a script file is executed Select-CIMClassAllProperties CmdLet function is loaded into the session. In our example this code will be executed:
Select-CIMClassAllProperties -InstallMenu $true
… and that will add Select-CIMClassAllProperties as Add-On Menu Item in Windows PowerShell ISE so we can use it as we need it. - Finally, our environment is customized and we see Windows PowerShell ISE application with Add-on “Select CIM or WMI Class Properties” added into our environment and we can start working on the environment
I hope this explains the steps in the previous section.

How To Use Select-CIMClassAllProperties CmdLet
We have several ways to exploit this fabulous CmdLet.
IMPORTANT: Open new PowerShell ISE Script Pane in order to call Select-CIMClassAllProperties CmdLet and get the result in this pane.
- We can call Select-CIMClassAllProperties CmdLet providing the name of CIM or WMI class in the PowerShell ISE Console and press ENTER. The result will be shown in the current PowerShell ISE Script Pane.

- We can write just the name of CIM or WMI class, SELECT the name that we have just written and go to the Add-ons menu and click on “Select CIM or WMI Class Properties”.

- We can write just the name of CIM or WMI class like in the previous example, SELECT the name that we have just written and press the shortcut Ctrl + Alt + W to run the same menu item “Select CIM or WMI Class Properties”.
The result will be the same for all of them. Call to a class using Get-CimInstance CmdLet and result pipelined to the Select statement with all properties listed for that class.

If we run generated code we will get as result CPU properties for the local machine.

INFO: PowerShell Pipelining is a very important concept and I highly recommend you to read the article written on the subject. How PowerShell Pipeline Works. Here I have shown in many examples the real power of PowerShell using the Pipelining.
Select-CIMClassAllProperties CmdLet Code
INFO: My best advice to every PowerShell scripter is to learn writing own PowerShell Advanced Functions and CmdLets and I have written several articles explaining this, so please read them. How To Create A Custom PowerShell CmdLet (Step By Step). Here I explain how to use PowerShell Add-on Function to be faster in writing PowerShell Functions How To Write Advanced Functions Or CmdLets With PowerShell (Fast).
Here is the source code of the whole Select-CIMClassAllProperties Add-on CmdLet. Enjoy!
<#
.SYNOPSIS
Get all the properties for CIM (Common Information Model) or WMI (Windows Management Instrumentation) class and write Select statement for that CIM or WMI Class.
.DESCRIPTION
Get all the properties for CIM (Common Information Model) or WMI (Windows Management Instrumentation) class and write Select statement for that CIM or WMI Class.
This is usefull when one wants to know what can be output from CIM or WMI class.
Which properties might be usefull and which are not.
.PARAMETER classname
CIM or WMI class name e.g. Win32_OperatingSystem
.EXAMPLE
Select-CIMClassAllProperties -classname "Win32_OperatingSystem"
.EXAMPLE
Select-CIMClassAllProperties -classname "CIM_Processor"
.NOTES
    FunctionName : Select-CIMClassAllProperties
    Created by   : Dejan Mladenovic
    Date Coded   : 01/18/2020 05:21:41
    More info    : http://improvescripting.com/
.LINK
How To Write Select Statement For All Properties Of CIM Or WMI Class With PowerShell
.OUTPUT
Output text in current PowerShell ISE Script Pane.
#>
Function Select-CIMClassAllProperties {
[CmdletBinding()]
param (
    [Parameter(HelpMessage="CIM or WMI class name.")]
    [string]$classname,
    $SelectedText = $psISE.CurrentFile.Editor.SelectedText,
    $InstallMenu,
    $ComputerName = 'localhost'
)

BEGIN {

        if ($InstallMenu)
        {
            Write-Verbose "Try to install the menu item, and error out if there's an issue."
            try
            {
                $psISE.CurrentPowerShellTab.AddOnsMenu.SubMenus.Add("Select CIM or WMI Class Properties",{Select-CIMClassAllProperties},"Ctrl+Alt+W") | Out-Null
            }
            catch
            {
                Return $Error[0].Exception
            }
        }

}
PROCESS {

        if (!$InstallMenu)
        {
            Write-Verbose "Don't run a function if we're installing the menu"
            try
            {
                Write-Verbose "Write Select statment for all the properties of CIM or WMI Class."

                if ($SelectedText )
                {
                    $class = "$SelectedText"
                } else {
                    $class = "$classname"
                }

                $CmiClass = Get-CimInstance -Class $class -ComputerName $ComputerName | Get-Member -MemberType Property | Select-Object Name

                $FirstItem = $true
                $CmiClass |

                ForEach-Object {
                    $propertyname = $_.Name
                    if ($FirstItem -eq $true) {
                        $properties = $propertyname
                        $FirstItem = $false
                    } else {
                        $properties = "$properties, $propertyname"
                    }
                }

                $l = $psise.CurrentFile.Editor.CaretLine
                $c = $psise.CurrentFile.Editor.CaretColumn
                $x = ''

                if ($c -ne 0)
                {
                    $x = ' ' * ($c - 1)
                }

                $psise.CurrentFile.Editor.InsertText("Get-CimInstance -Class $class -ComputerName $ComputerName | Select-Object $properties")
                $psise.CurrentFile.Editor.SetCaretPosition($l, $c + 3)

            }
            catch
            {
                Return $Error[0].Exception
            }
        }
}
END { }
}
#region Execution examples

    Select-CIMClassAllProperties -InstallMenu $true
    #Select-CIMClassAllProperties -classname "CIM_Processor"

#endregion
Well done! REMEMBER – PowerShell script every day!


