PowerShell module is by convention any valid PowerShell script saved as .psm1 extension (PowerShell Script Modules file) and it is a convenient way to organize and group our functions to our likes. In addition, we can decide with Export-ModuleMember CmdLet which functions or variables in the module (called Function Members by PowerShell terminology) can or cannot be visible to the outside world.
Completely optional we can create PowerShell Module Manifest file saved as .psd1 extension (PowerShell Data Files) to further describe our module with additional metadata that we will discuss a little bit later.
I know there are so many technical terms right from the start but I will try my best to further explain each and every term with some examples from the real world and use some analogy to help easier understanding even to non-technical persons.
Analogy
Let me use a bookstore analogy to try to explain PowerShell Modules (additionally CmdLets, Profiles).
We want to learn more about PowerShell programming language so one of the options is to buy a good book about PowerShell. So we go to a bookstore and when we enter the bookstore we can see many different departments in it (Art, Business, Computers, Literature, Travel, etc.). We go to the Computers department and on the shelves there search for the book about PowerShell. We can quickly scan through the books and look at the content to see which one is most convenient for us. Finally, we buy the one that suits us the best.
Let’s teleport back to PowerShell world and link the analogy story with PowerShell terms.
| PowerShell Term | Sign | Bookstore Analogy Story |
|---|---|---|
| CmdLet, Script, Function | = | The book |
| Code of CmdLet, Script, Function | = | Content of the book |
| PowerShell Module | = | Bookstore department = Computers |
| PowerShell Profile* | = | The Bookstore itself |
* I have written a separate post about PowerShell Profiles How To Create PowerShell Profile Step by Step with Examples
I would really like to emphasize two sections in the above-mentioned post about Profiles where I have described how to organize PowerShell Scripts, Functions, CmdLets into Modules and Import these modules in PowerShell Profiles so they are available for each PowerShell session we create when we open Windows PowerShell Console or ISE environment.
- How To Organize Your Own PowerShell CmdLets in PowerShell Modules and Profiles
- How We Link Together PowerShell Profile, Module, And CmdLet
Table of Contents
How To Create A PowerShell Module
Here are general steps that I will further discuss in the example that follows.
- Create Modules folder in $home\[My] Documents\WindowsPowerShell\ (only if you do not have it).
- Create a folder in the Modules folder with the same name as the .psm1 file that we will create in the next step.
- Create the PowerShell Module file (.psm1 extension file) in the folder created from the previous step. Remember that the Module file needs the same name as the folder that contains it.
- Optionally, create the PowerShell Manifest file (psd1 extension file) using New-ModuleManifest CmdLet with the same name as the module file and put it in the same folder. Detailed information about Manifest files is in this section.
- Write the Functions that you want to have in the module in PowerShell Module file ( .psm1 extension file ).
- Export the Functions and Variables that you have just written using Export-ModuleMember CmdLet. Exported Functions and Variables will be visible to the outside world of the module. If you want to keep Function or Variable private do not export it.
- Import modules (using Import-Module CmdLet) in PowerShell profile files if you want to have them loaded in each session of the Windows PowerShell Console and ISE environment.
- Test that module has been loaded in the environment using Get-Module CmdLet and ListAvailable parameter.
- List Functions that are loaded with Module using Get-Command CmdLet and Module parameter.
The take away from these steps is folder and file structure that needs to be followed in order to organize PowerShell code in modules.
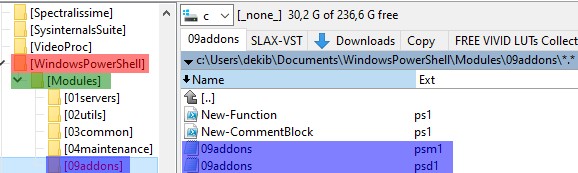
REMEMBER: PowerShell Module and Manifest files (.psm1 and .psd1 respectively) have the same name and they are saved in the folder with the same name as files (labeled blue on the screenshot). All the modules folders have to be under Modules Folder (labeled green) in the WindowsPowerShell folder (labeled red) of My Documents folders for the user that will load the module(s)
IMPORTANT: For PowerShell version 6.0 instead folder WindowsPowerShell home folder is PowerShell.
Example – How To Write PowerShell Modules (Different Approach)
I have a little bit different approach to how I customize my PowerShell Module files (.psm1 extension file) and I will explain that when we come to step 5.
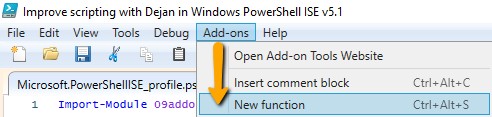
In this example, I will use my own module Add-ons that will add two functions into the Windows PowerShell ISE environment as Add-ons menu items (look screenshot below).
If you want to learn how to add functions to PowerShell ISE as Add-ons please read these two articles that describe the above functions.
- How To Write Advanced Functions Or CmdLets With PowerShell (Fast)
- How To Write PowerShell Function’s Or CmdLet’s Help (Fast)
All these example functions are part of the Efficiency Booster PowerShell Project that is a collection of CmdLets used by us in IT to help us with everyday IT tasks. If you want to follow me along I strongly advise you to download the source code from here.
Step 1: Create a Modules folder if you do not have it already.
New-Item -Path $home\Documents\WindowsPowerShell\Modules -ItemType "Container" -ErrorAction StopStep 2: Create the folder with the same name as module file (the module file will be created in the next step), in our example 09addons:
New-Item -Path $home\Documents\WindowsPowerShell\Modules\09addons -ItemType "Container" -ErrorAction StopStep 3: Create a PowerShell Module file (.psm1 extension file) with the same name as the folder that we have just created in step 2 and inside that folder (in our example 09addons.psm1 file).
New-Item -Path $home\Documents\WindowsPowerShell\Modules\09addons\09addons.psm1 -ItemType "File" -ErrorAction StopStep 4: Optionally, create a PowerShell Manifest file (.psd1 extension file) using New-ModuleManifest CmdLet and the manifest file has the same name as both module folder and module file (.psm1). In our example 09addons.psd1. Please read this section of the article in more detail about PowerShell Manifest.
NOTICE: By now we should have the following folder and file structure created as shown on the screenshot below. Remember that naming convention of files and folders is the must (Unless you want to change the value of $env:PSModulePath environment variable, read about that more here).
Step 5: Instead to write PowerShell functions in PowerShell Module file I prefer to write my functions in their own PowerShell script files and save them in module folder where module and manifest files are. In this example, we have New-Function.ps1 and New-CommentBlock.ps1 PowerShell script files where the code for these functions has been written as shown on the screenshot above.
Step 6: Load the PowerShell scripts (.ps1 files) into the module file (09addons.psm1) using a $psScriptRoot automatic variable. With this approach, we are organizing our scripts (PowerShell Functions) into modules and link them together. So our functions are commands of module 09addons.
. $psScriptRoot\New-CommentBlock.ps1
. $psScriptRoot\New-Function.ps1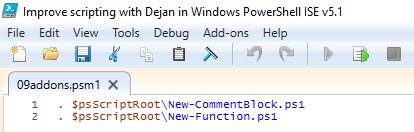
Step 7: Import PowerShell Module in PowerShell Profile using Import-Module CmdLet. For this example, we want to import a module in Microsoft.PowerShellISE_profile.ps1 which is the profile file for Windows PowerShell ISE host application since we want functions to be Add-ons in ISE and not in Windows PowerShell Console. Now we are linking PowerShell Profile and Module so when we open Windows PowerShell ISE the module will be loaded.
Import-Module 09addons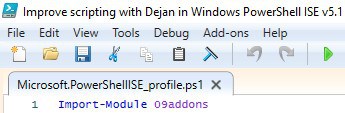
IMPORTANT: If you want to know how to create and customize PowerShell Profiles, which profile file to use, and much more with awesome examples please read the following post How To Create PowerShell Profile Step by Step with Examples
Step 8: Test the load of the module into the PowerShell environment using Get-Module CmdLet and ListAvailable parameter. In this case, we test that module 09addons has been loaded in the Windows PowerShell ISE environment.
Get-Module -ListAvailable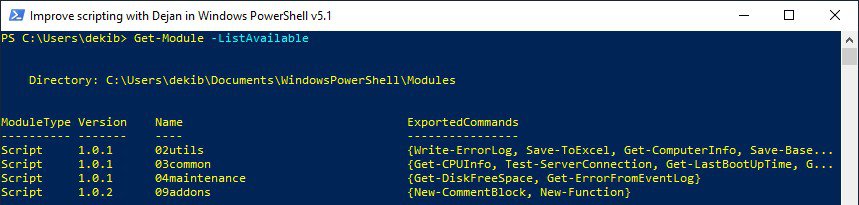
Step 9: Test that all the functions that belong to the module (09addons) are available for execution using Get-Command CmdLet and Module parameter.
Get-Command -Module 09addons
Finally, we can see that both functions have been added to the Windows PowerShell ISE environment as Add-on Menu Items.
SUMMARY: In order to understand why we have done previous steps let’s explain what is happening when we click on the icon for Windows PowerShell ISE to open.
- PowerShell will create a session for us and it will load PowerShell profile files including Microsoft.PowerShellISE_profile.ps1 into our session.
- The profile file will execute the import of the 09addons module command. In order to import the module, PowerShell will try to find and read both the module file and manifest file (09addons.psm1 and 09addons.psd1 files).
- While reading 09addons.psm1 file it will load the scripts (New-CommentBlock.ps1 and New-Function.ps1) that contain the code for functions that belong to the 09addons module.
- While the functions’ code in the scripts executes it will add functions as Add-on Menu Items in Windows PowerShell ISE
- and finally PowerShell will show us the ISE environment customized to our need and we can start working with it.
- Alles Klar?!
Where To Install A PowerShell Module
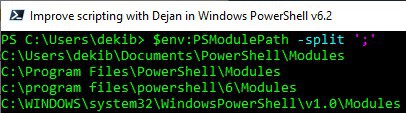
In order to find the locations where we can install our PowerShell modules, we use $ENV:PSModulePath environment variable.
$env:PSModulePath -split ';'
C:\Users\$env:username\[My] Documents\WindowsPowerShell\Modules
This is a folder where we should save modules that will be loaded for a specific user.
C:\Program Files\WindowsPowerShell\Modules
This is a folder where we should save modules that will be loaded for all users.
C:\WINDOWS\system32\WindowsPowerShell\v1.0\Modules
WARNING: This is a location for modules that come with Windows PowerShell. We must not install modules in this location.
NOTE: PowerShell version 6 has different module installation folders as you can see on the screenshot below.
Is It Possible To Have Own Module Installation Folders
The simple answer is yes and we have several solutions.
Solution 1: The temporary solution just for the current session is to run the following command:
$env:PSModulePath = $env:PSModulePath + ";c:\ImproveScripting\Modules"Solution 2: The permanent solution for every PowerShell session is to add the following command into a Windows PowerShell Profile:
$env:PSModulePath = $env:PSModulePath + ";c:\ImproveScripting\Modules"INFO: To learn more about Windows PowerShell Profiles read this article How To Create PowerShell Profile Step by Step with Examples
Solution 3: To update the Windows Registry for the computer run the following command:
$CurrentValue = [Environment]::GetEnvironmentVariable("PSModulePath", "Machine")
[Environment]::SetEnvironmentVariable("PSModulePath", $CurrentValue + ";C:\ImproveScripting\Modules", "Machine")
Solution 4: To update the Windows Registry for the user run the following command:
$CurrentValue = [Environment]::GetEnvironmentVariable("PSModulePath", "User")
[Environment]::SetEnvironmentVariable("PSModulePath", $CurrentValue + ";C:\ImproveScripting\Modules", "User")
What Is A PowerShell Module Manifest
PowerShell Module Manifest file is with extension .psd1 (PowerShell Data Files) and it is the same name as PowerShell Module file (.psm1 extension).
The PowerShell Manifest file has additional metadata that further describe the module. However, it is completely optional to create one but anyway it is considered as best practice for the module to be accompanied by the manifest file.
For example, we can add a module version number, author, company, copyright claims, description, minimum PowerShell requirements, and other system requirements, required modules if there are dependencies, functions that will be exported, release notes and much more.
How To Create A PowerShell Module Manifest
Step 1: Run New-Guid CmdLet to get GUID value that will be unique for the module manifest. Copy the GUID value for the next step.
New-GuidStep 2: Run New-ModuleManifest CmdLet to create PowerShell Manifest file (.psd1 file extension)
$manifest = @{
Path = 'C:\Users\dekib\Documents\WindowsPowerShell\Modules\09addons\09addons.psd1'
Author = 'Dejan Mladenovic'
CompanyName = 'ImproveScripting.com'
Copyright = '(c)2019 Dejan Mladenovic. All rights reserved.'
Description = '09addons module contains useful Add-ons to Windows PowerShell ISE'
GUID = '05ae6c6a-e7d7-4f78-98fd-63f174810a0f'
ModuleVersion = '1.0.2'
PowerShellVersion = '3.0'
FunctionsToExport = 'New-CommentBlock', 'New-Function'
ReleaseNotes = '... and as always countless tiny improvements are happening every single day. Check it out, and please let me know what you think! dejan'
RootModule = '09addons.psm1'
}
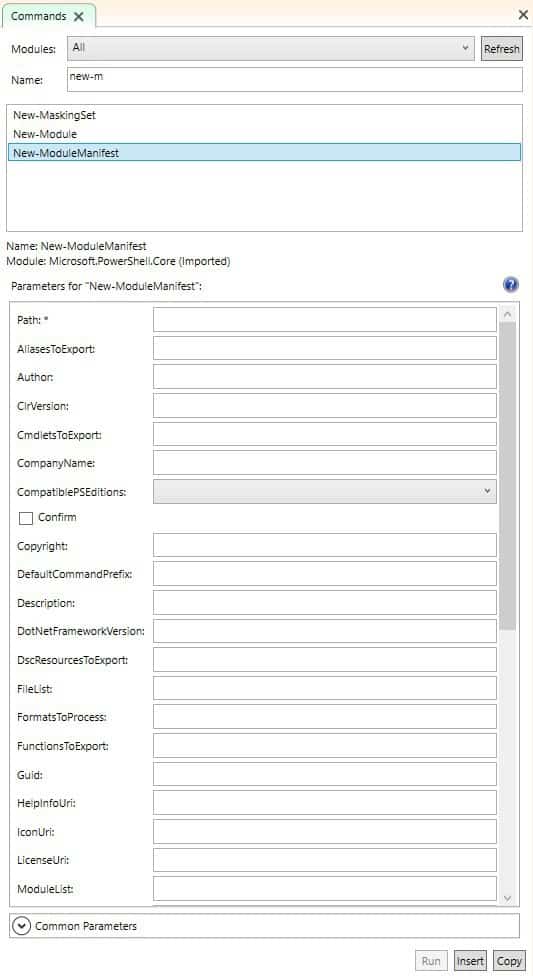
New-ModuleManifest @manifestAlternatively, we can use Command Add-on in Windows PowerShell ISE and fill out the data in the provided fields and click on the Run button to execute New-ModuleManifest CmdLet. If you do not see Commands Pane in Windows PowerShell ISE than go to View -> check Show Command Add-on and Commands Pane will pop up on the right-hand side from your Console and Script panes.
Step 3: Test PowerShell Module Manifest using Test-ModuleManifest CmdLet.
Test-ModuleManifest -Path 'C:\Users\dekib\Documents\WindowsPowerShell\Modules\09addons\09addons.psd1'
Step 4: If we need to update the PowerShell Module Manifest file we use Update-ModuleManifest CmdLet.
Update-ModuleManifest -Path 'C:\Users\dekib\Documents\WindowsPowerShell\Modules\09addons\09addons.psd1' -ModuleVersion '1.0.2'Step 5: Test the updated version value running Get-Module CmdLet with ListAvailable parameter
Get-Module -ListAvailable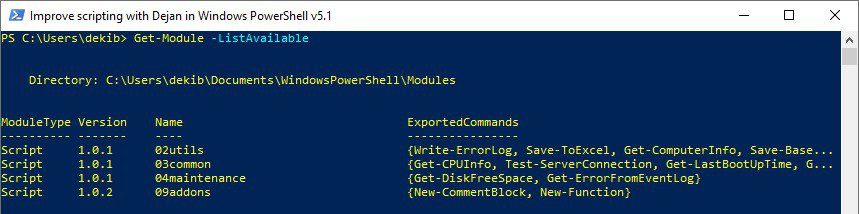
Useful PowerShell Module And Manifest Articles
Here are some useful articles and resources:
- About Modules
- Writing a Windows PowerShell Module
- Understanding a Windows PowerShell Module
- How to Write a PowerShell Script Module
- Installing a PowerShell Module
- Modifying the PSModulePath Installation Path
- Importing a PowerShell Module
- How to write a PowerShell module manifest
- Export-ModuleMember CmdLet
- Import-Module CmdLet
- New-ModuleManifest CmdLet
- Test-ModuleManifest CmdLet
- Update-ModuleManifest CmdLet
- $PSScriptRoot Automatic Variable
- About Environment Variables
PowerShell Module Manifest File Example
Here is the PowerShell Module Manifest file for the 09addons module.
#
# Module manifest for module 'PSGet_09addons'
#
# Generated by: Dejan Mladenovic
#
# Generated on: 04.09.2019
#

@{

# Script module or binary module file associated with this manifest.
RootModule = '09addons.psm1'

# Version number of this module.
ModuleVersion = '1.0.2'

# Supported PSEditions
# CompatiblePSEditions = @()

# ID used to uniquely identify this module
GUID = '05ae6c6a-e7d7-4f78-98fd-63f174810a0f'

# Author of this module
Author = 'Dejan Mladenovic'

# Company or vendor of this module
CompanyName = 'ImproveScripting.com'

# Copyright statement for this module
Copyright = '(c)2019 Dejan Mladenovic. All rights reserved.'

# Description of the functionality provided by this module
Description = '09addons module contains useful Add-ons to Windows PowerShell ISE'

# Minimum version of the Windows PowerShell engine required by this module
PowerShellVersion = '3.0'

# Name of the Windows PowerShell host required by this module
# PowerShellHostName = ''

# Minimum version of the Windows PowerShell host required by this module
# PowerShellHostVersion = ''

# Minimum version of Microsoft .NET Framework required by this module. This prerequisite is valid for the PowerShell Desktop edition only.
# DotNetFrameworkVersion = ''

# Minimum version of the common language runtime (CLR) required by this module. This prerequisite is valid for the PowerShell Desktop edition only.
# CLRVersion = ''

# Processor architecture (None, X86, Amd64) required by this module
# ProcessorArchitecture = ''

# Modules that must be imported into the global environment prior to importing this module
# RequiredModules = @()

# Assemblies that must be loaded prior to importing this module
# RequiredAssemblies = @()

# Script files (.ps1) that are run in the caller's environment prior to importing this module.
# ScriptsToProcess = @()

# Type files (.ps1xml) to be loaded when importing this module
# TypesToProcess = @()

# Format files (.ps1xml) to be loaded when importing this module
# FormatsToProcess = @()

# Modules to import as nested modules of the module specified in RootModule/ModuleToProcess
# NestedModules = @()

# Functions to export from this module, for best performance, do not use wildcards and do not delete the entry, use an empty array if there are no functions to export.
FunctionsToExport = 'New-CommentBlock', 'New-Function'

# Cmdlets to export from this module, for best performance, do not use wildcards and do not delete the entry, use an empty array if there are no cmdlets to export.
CmdletsToExport = @()

# Variables to export from this module
# VariablesToExport = @()

# Aliases to export from this module, for best performance, do not use wildcards and do not delete the entry, use an empty array if there are no aliases to export.
AliasesToExport = @()

# DSC resources to export from this module
# DscResourcesToExport = @()

# List of all modules packaged with this module
# ModuleList = @()

# List of all files packaged with this module
# FileList = @()

# Private data to pass to the module specified in RootModule/ModuleToProcess. This may also contain a PSData hashtable with additional module metadata used by PowerShell.
PrivateData = @{

    PSData = @{

        # Tags applied to this module. These help with module discovery in online galleries.
        # Tags = @()

        # A URL to the license for this module.
        # LicenseUri = ''

        # A URL to the main website for this project.
        # ProjectUri = ''

        # A URL to an icon representing this module.
        # IconUri = ''

        # ReleaseNotes of this module
        ReleaseNotes = '... and as always countless tiny improvements are happening every single day. Check it out, and please let me know what you think! dejan'

        # External dependent modules of this module
        # ExternalModuleDependencies = ''

    } # End of PSData hashtable

 } # End of PrivateData hashtable

# HelpInfo URI of this module
# HelpInfoURI = ''

# Default prefix for commands exported from this module. Override the default prefix using Import-Module -Prefix.
# DefaultCommandPrefix = ''

}