Here I will give you an awesome example of installing and configuring PowerShell Profiles, Modules and CmdLets from my personal experience and code used in the IT world many times helping us, IT experts, to accomplish our IT daily tasks faster and more accurately so we can boost our efficiency to another level.
In my further posts I will write more in detail about the link between Profiles, Modules and CmdLets so please bookmark this website and come back for more useful examples and tips about PowerShell.
About PowerShell Code and Project
Before we even go into steps on how to install I would like quickly to present to you what we want to accomplish.
We want to write our own PowerShell CmdLets that will have the same look and feel as CmdLets delivered with PowerShell by Microsoft.
Then we want to organize our own PowerShell CmdLets into modules based on the functionality of CmdLets, for example, I have created modules: Utils, Common, Maintenance, Add-ons. Like I have already written I would have explained them further in other posts so please bookmark this website as your PowerShell source and come back for more.
Efficiency Booster PowerShell Project is a library of my own CmdLets that we will just about to install so please download the zip file from here.
I will cover two ways how you can install the project files after downloading the zip:
- The first way covers the situation when you do not have any PowerShell module previously installed in your local profile and it is very easy and straight forward.
- The second installation covers of course situation when you do have some PowerShell modules already installed on your profile and this installation demands some more steps but do not worry I will walk you through the whole process step by step.
Installation Prerequisites
Here are the most important prerequisites special to this project:
- Enable execution of PowerShell scripts (read more article About Execution Policies in PowerShell documentation)
- Enable PowerShell remoting on each server in your network in order to run CmdLets on remote servers ( Read more articles: About Remote, About Remote Requirements, About Remote FAQ, About Remote Troubleshooting in PowerShell documentation)
- Open the ports on the firewall in order for PowerShell remoting to be able to listen to the remote command (port 5985 and 5986 for connections over HTTP and HTTPS, respectively)
- Check with the Network Infrastructure department about other network segmentation and settings constrains that can have a consequence for running PowerShell code.
How To Install And Configure PowerShell: CmdLets, Modules, Profiles (Step By Step)
IMPORTANT If you have installed Efficiency Booster PowerShell project files and you want to refresh/update installation with the latest files that you have just downloaded then take a backup of your WindowsPowerShell folder first just in case then overwrite all the files in My Documents and everything should be updated.
NOTE: If you want to install these CmdLets to PowerShell v 6.0 then copy the files to the “PowerShell” folder since this is the home folder for this version of PowerShell and not WindowsPowerShell.
Step 1 – Check-in My documents folder whether you have a folder with the exact name “WindowsPowerShell”.
If you do have such a folder in your My Documents than please bear with me and I will explain installation in a minute. This is the second installation scenario that I have just mentioned.
If you do not have such folder in your My Documents then the installation is pretty easy and straight forward since this is a clean installation of PowerShell files
Step 2 – Just unzip the content of Efficiency Booster zip file in My Documents and you have all the necessary project files.
Here is the content of “WindowsPowerShell” folder:

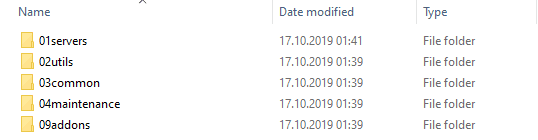
Here is the content of the Modules folder:
Customization
Now we need to do small customization in one CSV file so when you run Efficiency Booster CmdLets on your own machine it will show you accurate data about your machine name and IP address.
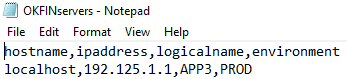
Step 3 – Open file OKFINservers.csv in ...\[My] Documents\WindowsPowerShell\Modules\01servers folder and change the following data:
- in the second line write your local machine’s name instead of localhost
- in the second line write your local machine’s IP address instead of 192.125.1.1
- APP3 means Application server number 3 (no need to change for now)
- PROD means Production environment (no need to change for now)
you can change the last two data (APP3, PROD) according to the role of your local machine or you can leave them as it is for now. I will explain these columns in more detail in further posts.
Here is the content of OKFINservers.csv file that needs to be customized:
The installation has been finished for this scenario.
Well Done!
You can move on to the testing section that I will show in a minute.
Now let’s install the project files in the second scenario when you do have the “WindowsPowerShell” folder in My Documents folder. Basically, that means that you probably either already have some other 3rd party CmdLets installed previously that you use it or you may be just customized your profile files to your needs and we do not want to mess them up by overwriting with our project files with the same name.
Step 4 – So unzip the Efficiency Booster zip file in some temp folder.
Step 5 – copy all the files and folders from the Modules folder (the content of that folder you can see on the screenshot in Step 2) into the Modules folder within your …\[My] Documents\WindowsPowerShell\Modules folder.
Now we have all the PowerShell CmdLets from Efficiency Booster project except PowerShell profile files.
Step 6 – Open the Profile.ps1 file in your temp folder and copy the content of that file.

Step 7 – Go to …\[My] Documents\WindowsPowerShell and open Profile.ps1 file there and paste the content that you have just copied. Now we have linked Efficiency Booster modules to your existing PowerShell profile plus you keep the content of your profile that has some other 3rd party modules that you have previously installed or some other profile customization. So next time when you open your PowerShell shell your profile will load Efficiency Booster modules as well.
Step 8 – Open Microsoft.PowerShellISE_profile.ps1 file in your temp folder and copy the content of that file.
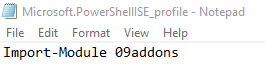
Step 9 – Go to …\[My] Documents\WindowsPowerShell and open Microsoft.PowerShellISE_profile.ps1 file there (if you do not have it then copy the whole file from a temp folder) and paste the content that you have just copied.
NOTE: – While we run the CmdLets that are part of the Efficiency Booster PowerShell project the following folders will be created in My documents folder:
- PSbaselines (keeps XML files)
- PSlogs (writes all the errors within CmdLets run into Error_Log.txt file)
- PSreports (Excell sheet reports are written here)
In future posts, I will explain the use of each folder so you understand the reason for their existence.
Repeat step 3 – We need to do the same customization for this scenario as we did with the first scenario installation and that is to edit the CSV file.
Testing
Let’s quickly test our installation and customization to make sure that everything has been done correctly.
First, we can test that all the modules load in PowerShell Console Environment:
Get-Module -ListAvailable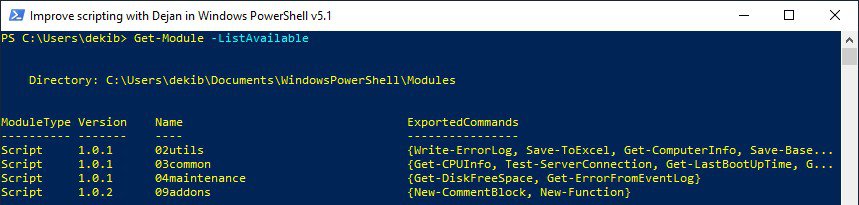
Second, we want to check that command of all the modules has been loaded as well in PowerShell Console Environment:
Get-Command -Module 03common 
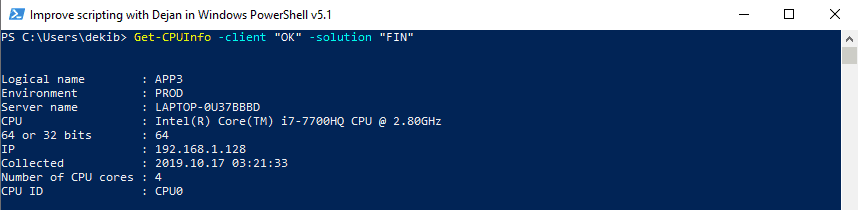
Finally, we want to test one of the CmdLets in the installed project. Copy the following code and run from PowerShell Console.
Get-CPUInfo -client "OK" -solution "FIN"As a result of running Get-CPUInfo CmdLet, we should get CPU properties for the local machine. Check that the value for Server Name is correct for your local machine and IP address is exactly as the one that we have done in the customization section.
Congratulations and Well Done!