It is important to save the space on the disk and for that reason compressing the files is very useful. If we can do some automation while compressing and saving the space it is even better. PowerShell scripts for compressing and extracting are nice tools that can save a tone of time for us.
In this article I will show you many examples with different approaches to compress and extract files while using PowerShell scripts.
First, we can see native PowerShell approach using CmdLets:
- Compress-Archive
- Expand-Archive
Next, we can see the .NET approach using System.IO.Compression .NET Library and PowerShell combined.
In addition, if we have installed WinRAR or 7-Zip File Manager applications we can combine these with PowerShell and do the compressing and extraction as well.
Finally, there is 7Zip4Powershell PowerShell Module developed by Thomas Freudenberg that can be very handy and do excellent job for us.
In the end, I will show you some special cases of compressing when it is required to password protect the compressed file or when you want to compress only files of a certain “age”. Even further we will cover the read of compress file and deletion of files that are in the compressed file.
So let’s look at all these approaches and discuss different example codes.
Table of Contents
Different Approaches To Compress (Zip) Files Or Folders Using PowerShell
Compress (Zip) Files Or Folders Using PowerShell Compress-Archive CmdLet
To Compress the files or folders using PowerShell native approach we will use Compress-Archive CmdLet. In the simplest example if we want to compress some files we will use just two parameters of Compress-Archive CmdLet.
- Path parameter with the value pointing to the file(s) that will be compressed.
- DestinationPath parameter with the value of the location and name of the compression file.
Here is an example call to Compress-Archive CmdLet:
Compress-Archive -Path "C:\Temp\ToBeZipped\Error_Log.txt" -DestinationPath "C:\Temp\Zip\CompressArchive.zip"As you can see this piece of code has just created compressed archive for us with specified name and location.

I have just mentioned that this is the simplest example but in the section Compress-Archive CmdLet Examples of this article, I have shown to you many other useful examples for different scenarios.
Compress (Zip) Files Or Folders Using PowerShell And System.IO.Compression .NET Library
We can use .NET classes with PowerShell to compress files or folders from the System.IO.Compression namespace. In the following example, we have used the CreateFromDirectory method of ZipFile Class and passed four parameters
- Source folder where the file(s) that will be compressed is,
- the destination of the compressed file,
- compression level (with possible values Optimal, Fastest, NoCompression),
- and the last parameter means we want to include only the content of the source directory but not the source directory itself.
Add-Type -Assembly System.IO.Compression.FileSystem

$sourcedir = "C:\Temp\ToBeZipped\PSlogs"
$zipfilename = "C:\Temp\Zip\ZipWithNETAssembly.zip"
$compressionLevel = [System.IO.Compression.CompressionLevel]::Optimal

[System.IO.Compression.ZipFile]::CreateFromDirectory($sourcedir,$zipfilename, $compressionLevel, $false)
Here is the resulting compressed file:

In my opinion this approach is more natural to .NET programmers and less to PowerShell scripters but as always it is very useful to have this approach in the skill set.
Compress (Zip) Files Or Folders Using PowerShell And 7-Zip
If we have a 7-Zip File Manager Application installed on our system we can use it with PowerShell to archive files or folders. I have written short function Write-ZipWith7Zip with four parameters that do the job.
function Write-ZipWith7Zip(
    [string]$FilesToZip,
    [string]$ArchiveFileName,
    [string]$Password,
    [ValidateSet('7z','zip','gzip','bzip2','tar','iso','udf')]
    [string]$CompressionType = 'zip'
)
{

    $static7ZipPath = "\7-Zip\7z.exe"
    $pathTo64Bit7ZipExe = "$env:ProgramFiles" + $static7ZipPath
    $pathTo32Bit7ZipExe = "${env:ProgramFiles(x86)}" + $static7ZipPath

    # Find the location of 7-Zip executable or throw the error if not found on the system
    if (Test-Path $pathTo64Bit7ZipExe) {
        $pathTo7ZipExecutable = $pathTo64Bit7ZipExe
    } elseif (Test-Path $pathTo32Bit7ZipExe) {
        $pathTo7ZipExecutable = $pathTo32Bit7ZipExe
    } else {
        throw "7-Zip File Manager not on found on this system!"
    }

    # Delete the destination archive file if it already exists (i.e. overwrite it).
    if (Test-Path $ArchiveFileName) { Remove-Item $ArchiveFileName -Force }

    # Prepare arguments before making the call
    $arguments = "a -t$CompressionType ""$ArchiveFileName"" ""$FilesToZip"" -mx9"

    # Add password argument if provided
    if (!([string]::IsNullOrEmpty($Password))) { $arguments += " -p$Password" }

    # Do the magic. Zip the files
    $p = Start-Process $pathTo7ZipExecutable -ArgumentList $arguments -Wait -PassThru -WindowStyle "Hidden"

    # If the files were not zipped successfully.
    if (!(($p.HasExited -eq $true) -and ($p.ExitCode -eq 0)))
    {
        throw "Houston we got a problem. Zip file not created '$ZipFilePath'."
    }

}
Here is an example call to the Write-ZipWith7Zip function that will create a zip file. We are just using two parameters of this function:
- FilesToZip – Path to the folder where files to be compressed are located.
- ArchiveFileName – Path where we want the archive to save with the archive file name.
Write-ZipWith7Zip -FilesToZip "C:\Temp\ToBeZipped\PSlogs" -ArchiveFileName "C:\Temp\Zip\ZipWith7Zip.zip" Here is the resulting archive file:

The downside of this approach is that we need application 7-Zip installed on our system so PowerShell is dependent on it.
NOTE: We will use this function again when we discuss different approaches to password protect our compressed archive in the subheading “How To Compress (Zip) With Password Protection Using 7-Zip And PowerShell“.
Compress (Zip) Files Or Folders Using PowerShell and WinRAR
If we have a WinRAR File Manager Application installed on our system we can use it with PowerShell to archive files or folders. I have written short function Write-ZipWithRAR with three parameters that do the job.
function Write-ZipWithRAR(
    [string]$FilesToZip,
    [string]$ArchiveFileName,
    [string]$Password
)
{

    $staticWinRARPath = "\WinRAR\WinRAR.exe"
    $pathTo64BitWinRARExe = "$env:ProgramFiles" + $staticWinRARPath
    $pathTo32BitWinRARExe = "${env:ProgramFiles(x86)}" + $staticWinRARPath

    # Find the location of WinRAR executable or throw the error if not found on the system
    if (Test-Path $pathTo64BitWinRARExe) {
        $pathToWinRARExecutable = $pathTo64BitWinRARExe
    } elseif (Test-Path $pathTo32BitWinRARExe) {
        $pathToWinRARExecutable = $pathTo32BitWinRARExe
    } else {
        throw "WinRAR File Manager not on found on this system!"
    }

    # Delete the destination archive file if it already exists (i.e. overwrite it).
    if (Test-Path $ArchiveFileName) { Remove-Item $ArchiveFileName -Force }

    # Prepare arguments before making the call
    $arguments = "a -r -afzip -ep1 ""$ArchiveFileName"" ""$FilesToZip"""

    # Add password argument if provided
    if (!([string]::IsNullOrEmpty($Password))) { $arguments += " -p$Password" }

    # Do the magic. Zip the files
    $p = Start-Process $pathToWinRARExecutable -ArgumentList $arguments -Wait -PassThru

    # If the files were not zipped successfully.
    if (!(($p.HasExited -eq $true) -and ($p.ExitCode -eq 0)))
    {
        throw "Houston we got a problem. Zip file not created '$ZipFilePath'."
    }

}
In this simple example call to the Write-ZipWithRAR function we will create a zip file using just two parameters:
- FilesToZip – Path to the folder where files to be compressed are located.
- ArchiveFileName – Path where we want the archive to save with the archive file name.
Write-ZipWithRAR -FilesToZip "C:\Temp\ToBeZipped\PSlogs\" -ArchiveFileName "C:\Temp\Zip\ZipWithWinRAR.zip"Here is the resulting archive file:

The downside of this approach is that we need application WinRAR installed on our system so PowerShell is dependent on it.
NOTE: We will use this function again when we discuss different approaches to password protect our compressed archive in the subheading “How To Compress (Zip) With Password Protection Using WinRAR And PowerShell“.
Compress (Zip) Files Or Folders Using PowerShell and 7Zip4Powershell Module
7Zip4Powershell is PowerShell Module developed by Thomas Freudenberg and used for creating and extracting 7-Zip archives. If you have not already installed this module than the first thing to do is to install this module with the command:
Install-Module -Name 7Zip4PowershellREMEMBER: You need to run PowerShell Console as an Administrator in order to successfully install this module!
After installing the module we can quickly investigate commands that comes with this Module:
Get-Command -Module 7Zip4PowershellHere is the list of commands from PowerShell Module 7Zip4Powershell:

Of course, we will use Compress-7Zip CmdLet from 7Zip4Powershell Module to compress our files or folders. Here is one simple example call to Compress-7Zip CmdLet in order to create a Zip compressed file:
Compress-7Zip -ArchiveFileName "C:\Temp\Zip\ZipWith7Zip4Powershell.zip" -Path "C:\Temp\ToBeZipped\PSlogs" -Format ZipHere is resulting zip file in the folder.

NOTE: I will show you more features of Compress-7Zip CmdLet when I write about how to zip files or folders with password protection using PowerShell. More about that if you click on this link.
Compress-Archive CmdLet – Examples
Before we dive into many examples let me just quickly mention and explain the most important parameters of Compress-Archive CmdLet:
- Path – specifies the path or the paths to the files that we want to add to the archive compressed file. It is a positional parameter with position 0 and accepts wildcards.
- DestinationPath – specifies the path to the archive output file (zip). It is a mandatory parameter on position 1.
- LiteralPath – It is very similar to the Path parameter but the only difference is that it doesn’t interpret any character in the path as a wildcard.
- CompressionLevel – specifies how much compression to apply and possible values are:
- Optimal – Processing time is dependant on the file size. It is the default value.
- Fastest – Uses the fastest compression method.
- NoCompression – no compression applied.
- Force – Allows you to overwrite the existing archive.
- PassThru – Causes the cmdlet to output a file object representing the archive file created.
- Update – Used to add new files to archive or update existing files in archives with an updated version of files.
How To Compress (Zip) Files To Create An Archive File Using PowerShell
If we have several files but in different locations that we want to compress together we can again use Compress-Archive CmdLet with the following example:
$Zip = @{
    Path ="C:\Temp\ToBeZipped\OKFINservers.txt", "C:\Temp\ToBeZipped\PSlogs\Error_Log.txt"
    CompressionLevel = "Optimal"
    DestinationPath = "C:\Temp\Zip\FilesZipped.zip"
}
Compress-Archive @Zip
NOTE: We have used splatting to prepare values for CmdLet input parameters. If you want to know more About Splatting please read this article.
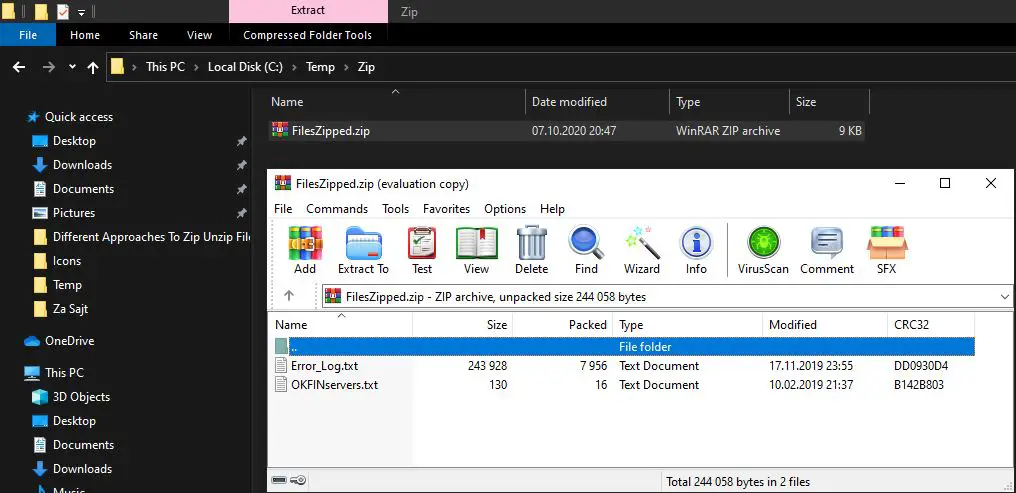
Here we can see resulting archive and the content of archive with two files in it:
How To Compress (Zip) Only Text Files Using PowerShell
In this example, we will first filter out only text files (*.txt) in the folder and then these text files will be compressed:
$Zip = @{
    Path ="C:\Temp\ToBeZipped\*.txt"
    CompressionLevel = "Optimal"
    DestinationPath = "C:\Temp\Zip\TextFilesZipped.zip"
}
Compress-Archive @Zip
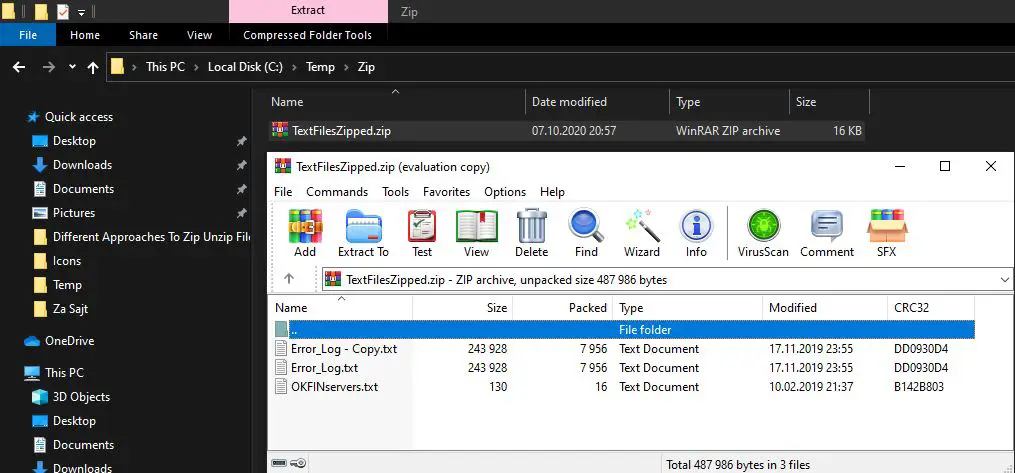
As you can see on the screenshot below we have compressed archive and the content of the archive are only text files.
How To Compress (Zip) Only Files But No Folders Using PowerShell
In this example, we will compress all the files from the folder but no folders simply using the wildcard (*.*).
$Zip = @{
    Path ="C:\Temp\ToBeZipped\*.*"
    CompressionLevel = "Optimal"
    DestinationPath = "C:\Temp\Zip\OnlyFilesZipped.zip"
}
Compress-Archive @Zip
Now in the result we have both text and csv files since we do not filter any specific file extension before applying compression.

How To Compress (Zip) Only XML Files Using PowerShell Pipeline
For this example, we will do it a little bit differently. First, we will list all XML files in the current directory and then pipeline the result to Compress-Archive CmdLet
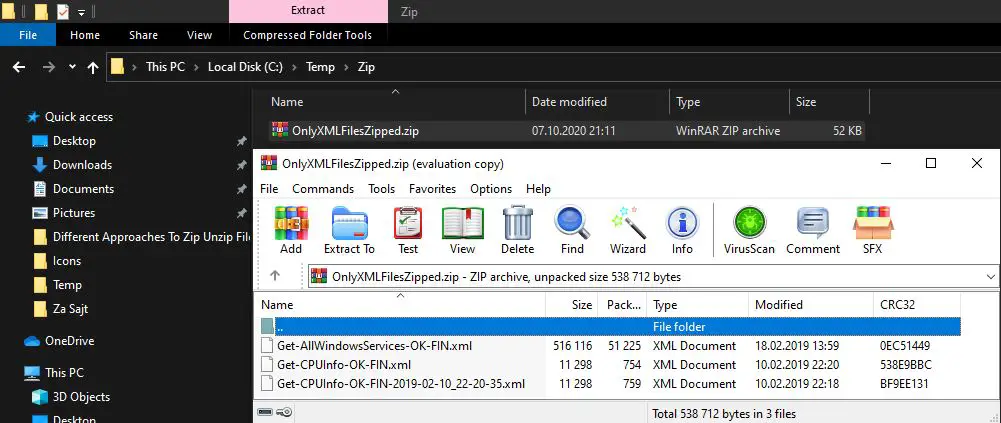
Get-ChildItem . -Include *.xml -Recurse -Force | Compress-Archive -CompressionLevel "Fastest" -DestinationPath "C:\Temp\Zip\OnlyXMLFilesZipped.zip" Here is the resulting archive with only XML files in it.
INFO: One cannot say that understand PowerShell without fully comprehend PowerShell Pipeline so please read PowerShell Pipeline Concept Explained With Awesome Examples to find out more about this important feature of PowerShell.

How To Compress (Zip) All Subdirectories (Subfolders) And Files But No Root Folder Using PowerShell
In this example, we want to compress all the files and subfolders but not the root folder. In order to achieve that we will just add “*” at the end in the Path parameter.
$Zip = @{
    Path ="C:\Temp\ToBeZipped\*"
    CompressionLevel = "Optimal"
    DestinationPath = "C:\Temp\Zip\SubFoldersAndFilesZipped.zip"
}
Compress-Archive @Zip
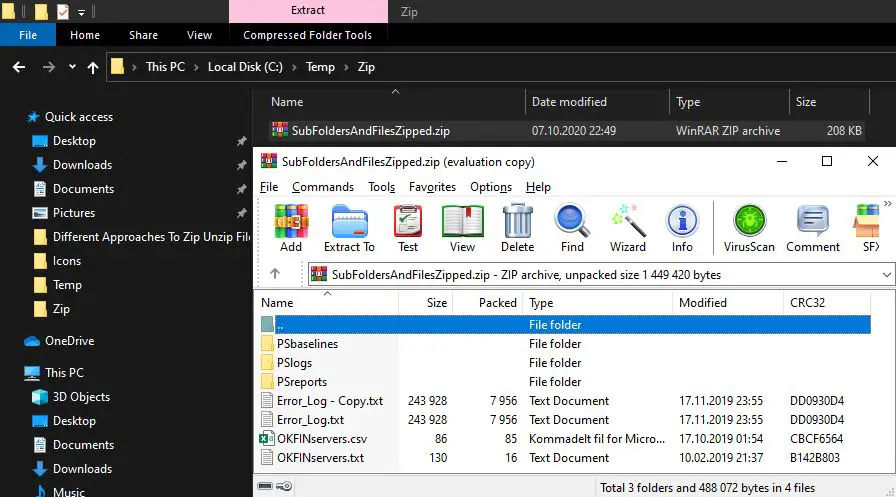
Here is the resulting archive.
How To Update and Add New Files Into Compress (Zip) Using PowerShell
First we will compress these files in the archive (zip) file:

We will use this example code to make initial archive:
$Zip = @{
    Path ="C:\Temp\ToBeZipped\*"
    CompressionLevel = "Optimal"
    DestinationPath = "C:\Temp\Zip\UpdateZipped.zip"
}
Compress-Archive @Zip
As you can see the content of archive (zip) file is the same.
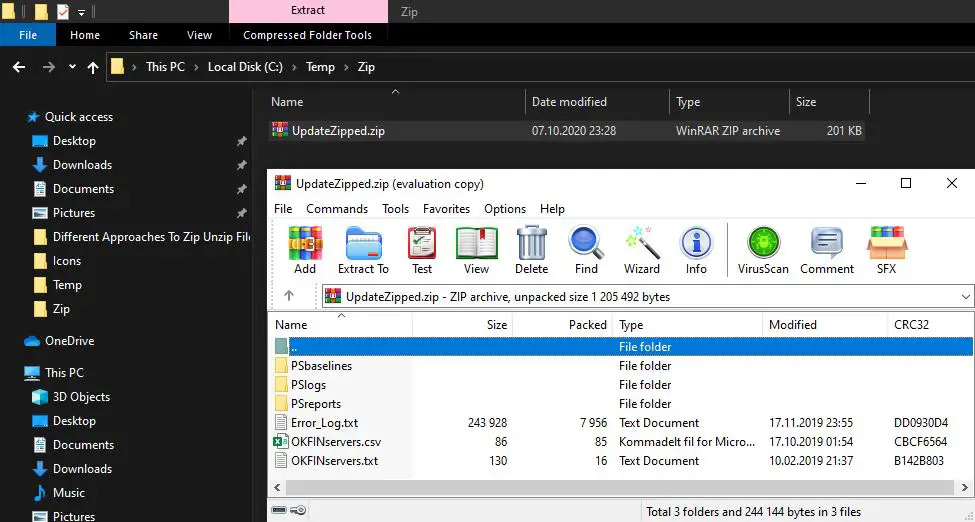
So let’s change one of the files and add one new file in the same location and run again the code but with one additional parameter (Update)
We have added Computers.txt file and updated Error_Log.txt file (made it larger).

Now we will run this example code but this time with additional parameter Update that will update our existing archive compressed zip file (UpdateZipped.zip)
$Zip = @{
    Path ="C:\Temp\ToBeZipped\*"
    CompressionLevel = "Optimal"
    DestinationPath = "C:\Temp\Zip\UpdateZipped.zip"
    Update = $true
}
Compress-Archive @Zip
As you can see on the screenshot bellow our updated archive compressed zip has additional file and updated existing Error_Log.txt with newer version of the same file.

NOTE: If we delete the file from the folder and try to compress the archive again using the Update parameter deleted file will not be removed from the compressed archive (zip). To delete items in the compressed archive we use a different approach explained in the subheading “How To Delete File In Compressed Archive Using PowerShell“.
Different Approaches To Extract(Unzip) Files Or Folders Using PowerShell
Extract The Files Or Folders From Compressed Archives Using PowerShell Expand-Archive CmdLet
To Extract the files or folders from compressed files using PowerShell native approach is to use Expand-Archive CmdLet. The simplest call to Expand-Archive CmdLet that will extract the content from the compressed (zipped) archive is to provide values for two parameters:
- Path – pointing to the location of the compressed zip archive.
- DestinationPath – with the value of the location where we want extracted files to be.
Here is the simple example:
Expand-Archive -Path "C:\Temp\Zip\FilesZipped.zip" -DestinationPath "C:\Temp\UnZip"Here we can see the extracted content:

Like we did for Compress-Archive CmdLet let me just quickly mention and explain the most important parameters of Expand-Archive CmdLet:
- Path – specifies the path to the compressed archive file (zip) that we want to extract. It is a positional parameter with position 0.
- DestinationPath – specifies the path to the folder where we want to extract. It is a parameter on position 1.
- LiteralPath – It is very similar to the Path parameter but the only difference is that it doesn’t interpret any character in the path as a wildcard.
- Force – runs without asking for user confirmation.
- PassThru – Causes the cmdlet to output a list of files expended from the compressed archive.
Extract Files Or Folders Using PowerShell And System.IO.Compression .NET Library
We can use .NET classes from the System.IO.Compression namespace with PowerShell to extract files or folders. In the following example, we have used the ExtractToDirectory method of ZipFile Class and passed two parameters:
- sourceArchiveFileName – path to a compressed file.
- destinationDirectoryName – path to the folder where extracted files will be extracted.
Add-Type -Assembly System.IO.Compression.FileSystem

$sourceArchive = "C:\Temp\Zip\FilesZipped.zip"
$destinationFolder = "C:\Temp\UnZip"

[System.IO.Compression.ZipFile]::ExtractToDirectory($sourceArchive,$destinationFolder)
Here is the extracted content:

Extract Files Or Folders Using PowerShell and 7Zip4Powershell Module
7Zip4Powershell is PowerShell Module developed by Thomas Freudenberg and used for creating and extracting 7-Zip archives. If you have not already installed this module than the first thing to do is to install this module with the command:
Install-Module -Name 7Zip4PowershellREMEMBER: You need to run PowerShell Console as an Administrator in order to successfully install this module!
After installing the module we can quickly investigate commands that come with this Module:
Get-Command -Module 7Zip4PowershellHere is the list of commands from PowerShell Module 7Zip4Powershell:

We will use Expand-7Zip CmdLet from 7Zip4Powershell Module to extract our files or folders. Here is one simple example call to Expand-7Zip CmdLet in order to extract files from compressed archive:
Expand-7Zip -ArchiveFileName "C:\Temp\Zip\FilesZipped.zip" -TargetPath "C:\Temp\UnZip"Here are the extracted files:

NOTE: I will show you more features of the 7Zip4Powershell Module when I write about how to zip files or folders with password protection using PowerShell. More about that if you click on this link.
How To Read The Content Of Compressed File Using PowerShell
To read the content of the compressed file we will use the ZipArchive Class and Stream Class. Here is an example:
Add-Type -Assembly System.IO.Compression.FileSystem

$ZipFile = 'C:\Temp\Zip\SubFoldersAndFilesZipped.zip'


$Stream = New-Object IO.FileStream($ZipFile, [IO.FileMode]::Open)

$ZipArchive    = New-Object IO.Compression.ZipArchive($Stream)

$ZipArchive.Entries  |
    Select-Object Name,
                  @{Name="File Path";Expression={$_.FullName}},
                  @{Name="Compressed Size (KB)";Expression={"{0:N2}" -f($_.CompressedLength/1kb)}},
                  @{Name="UnCompressed Size (KB)";Expression={"{0:N2}" -f($_.Length/1kb)}},
                  @{Name="File Date";Expression={$_.LastWriteTime}} | Out-GridView

$ZipArchive.Dispose()
$Stream.Close()
$Stream.Dispose()
IMPORTANT: We have used ZipArchive and Stream Classes since both have the Dispose method and we avoid locking the compressed file (zip) while running the script in the client application (PowerShell ISE).
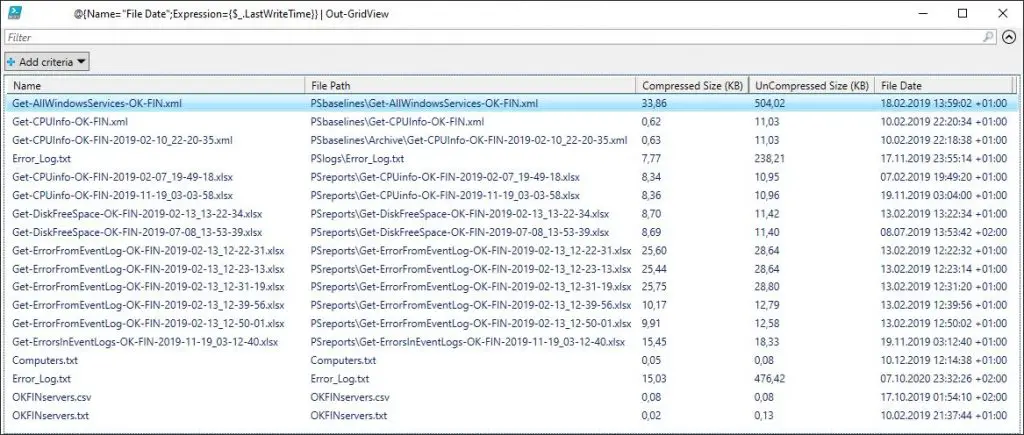
Here is the result and content of read compressed archive:
How To Delete File In Compressed Archive Using PowerShell
In this example, we will delete files with specific names but first, let’s create the compressed archive (zip) using the following example code:
$Zip = @{
    Path ="C:\Temp\ToBeZipped\*"
    CompressionLevel = "Optimal"
    DestinationPath = "C:\Temp\Zip\SubFoldersAndFilesZipped.zip"
}
Compress-Archive @Zip
If we use the code from the previous example in the subheading “How To Read The Content Of Compressed File Using PowerShell” we will see the content of the compressed file.

We will use ZipArchive and Stream .NET Classes to open the compressed file and delete each file that has a specified name:
Add-Type -Assembly System.IO.Compression.FileSystem

$zipfile = 'C:\Temp\Zip\SubFoldersAndFilesZipped.zip'
$files   = 'Error_Log.txt', 'OKFINservers.csv'

$stream = New-Object IO.FileStream($zipfile, [IO.FileMode]::Open)
$mode   = [IO.Compression.ZipArchiveMode]::Update
$zip    = New-Object IO.Compression.ZipArchive($stream, $mode)

($zip.Entries | ? { $files -contains $_.Name }) | % { $_.Delete() }

$zip.Dispose()
$stream.Close()
$stream.Dispose()
IMPORTANT: We have used ZipArchive and Stream Classes since both have the Dispose method and we avoid locking the compressed file (zip) while running the script in the client application (PowerShell ISE).
($zip.Entries | ? { $files -contains $_.Name }) | % { $_.Delete() }NOTE: We have not used ForEach to go through all the entries in order to find the correct one for deletion. Instead, we have used the above line of code. The reason is to avoid the following error:
An error occurred while enumerating through a collection: Collection was modified;
enumeration operation may not execute..
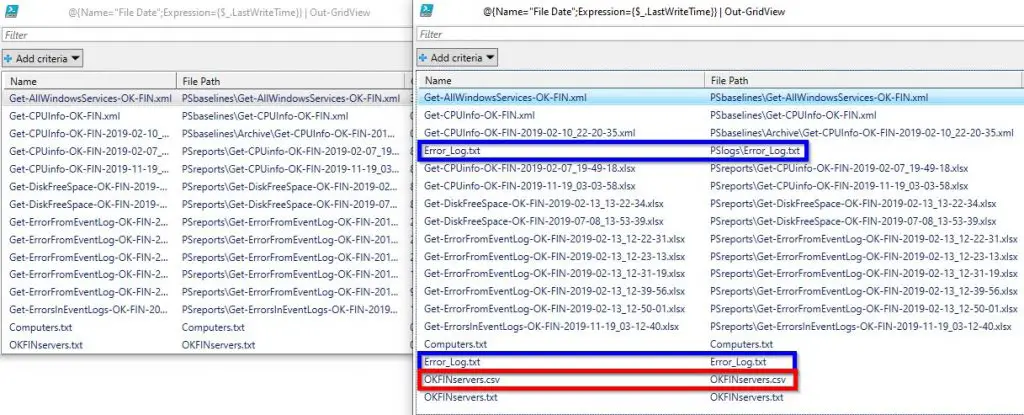
Let’s go back and read the content of the compressed file once again after deletion. As we can see Error_Log.txt file has been deleted twice since it was on two locations in the compressed file and OKFINservers.csv only once.
How To Compress (Zip) With Password Protection Using PowerShell
In this section, I will provide several solutions if you want to password protect your compressed archives.
How To Compress (Zip) With Password Protection Using 7-Zip And PowerShell
We can again use function Write-ZipWith7Zip written above but this time we will in addition provide value for the password parameter. Here is an example call to Write-ZipWith7Zip PowerShell Function:
Write-ZipWith7Zip -FilesToZip "C:\Temp\ToBeZipped\PSlogs" -ArchiveFileName "C:\Temp\Zip\PasswordZipWith7Zip.zip" -Password "Password"Here is the resulting archive file:

If we try to extract the file we are prompted to provide password:
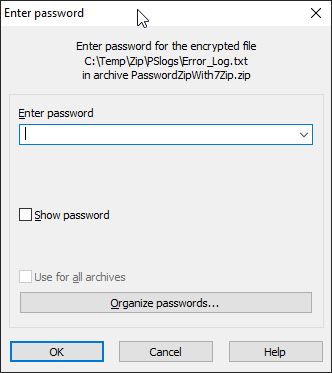
Finally we can look at the extracted file.

How To Compress (Zip) With Password Protection Using WinRAR And PowerShell
We can again use function Write-ZipWithRAR written above but this time we will in addition provide value for the password parameter. Here is an example call to Write-ZipWithRAR PowerShell Function :
Write-ZipWithRAR -FilesToZip "C:\Temp\ToBeZipped\PSlogs\" -ArchiveFileName "C:\Temp\Zip\PasswordZipWithWinRAR.zip" -Password "Password"Here is the resulting archive file:

If we try to extract the file we are prompted to provide password:
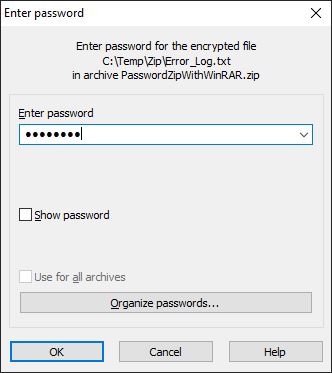
Finally we can look at the extracted file.

How To Compress (Zip) With Password Protection Using 7Zip4Powershell And PowerShell
As I have already written 7Zip4Powershell is PowerShell Module developed by Thomas Freudenberg and used for creating and extracting 7-Zip archives. If you have not already installed this module than the first thing to do is to install this module with the command:
Install-Module -Name 7Zip4PowershellREMEMBER: You need to run PowerShell Console as an Administrator in order to successfully install this module!
We have two options to compress our files or folders and protect them with a password at the same time using Compress-7Zip CmdLet.
The first option is less secure since our password is visible in the source code and here is an example call for that using a password parameter:
Compress-7Zip -ArchiveFileName "C:\Temp\Zip\ZipFileWithPassword.zip" -Path "C:\Temp\ToBeZipped\PSlogs" -Format Zip -Password "P@ssw0rd"Here is the resulting zip file:

If we try to extract the compressed file in Windows we are prompted to provide password.
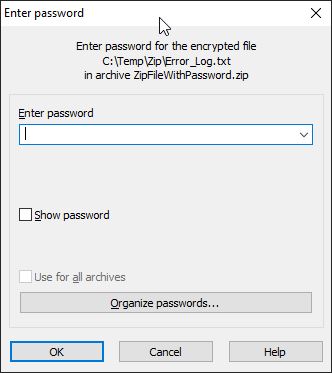
After typing the correct password we can see the extracted file.

The second option is more secure since the password is not visible in the source code but it demands from us one additional step that I will show you right away.
First, we need to encrypt and save our password in an external text file using the following command:
Read-Host -AsSecureString | ConvertFrom-SecureString | Out-File -FilePath "C:\Users\dekib\Documents\PSCredential\ZipWithPassword.txt"When we run the previous line of code we are prompted to provide a password that will be encrypted and saved in an external text file specified in the FilePath parameter.

Now we are ready to use Compress-7Zip CmdLet again but this time with the SecurePassword parameter like in the following example:
$EncryptedPasswordFile = "$home\Documents\PSCredential\ZipWithPassword.txt"
$password = Get-Content -Path $EncryptedPasswordFile | ConvertTo-SecureString

Compress-7Zip -ArchiveFileName "C:\Temp\Zip\ZipFileWithSecurePassword.zip" -Path "C:\Temp\ToBeZipped\PSlogs" -Format Zip -SecurePassword $password
Here is the resulting compressed file in the folder.

If we try to extract the file from the zip we are again prompted to provide a password in order to extract the file like in the previous example.

After typing the correct password we can see the extracted file.

How To Compress (Zip) Files Older Than X Days Using PowerShell
This is a very simple and easy example where we use Get-ChildItem CmdLet to find the files that we want to compress and then we further filter out the files older than a specified number of days using the AddDays Method of Get-Date CmdLet and finally, we compress the files using Compress-Archive CmdLet as we have learned so far.
Get-ChildItem -Path "C:\Temp\ToBeZipped" -Recurse | Where-Object {$_.LastWriteTime -LT (Get-Date).AddDays(-500)} | Compress-Archive -CompressionLevel Fastest -DestinationPath "C:\Temp\Zip\FilesOlderThan.zip"Here is the content of compressed file:
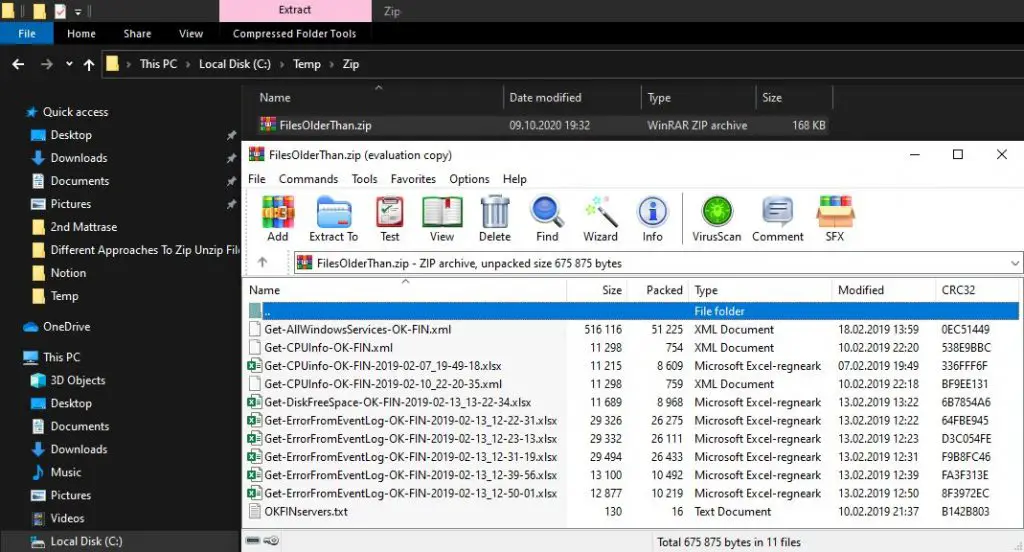
This is very important and useful when we want to archive older files on our system so they take less space on the servers. It is even better if we can move them to a dedicated archive server and let our application and other servers work with less load with respect to the number of files.
Useful PowerShell Zip / Unzip Articles
Here are some useful articles and resources:
- Compress-Archive
- Expand-Archive
- System.IO.Compression Namespace
- ZipArchive Class
- ZipFile Class
- 7Zip4Powershell


